Yellow Snowballs

white chocolate meyer lemon truffles aka yellow snowballs

Yes, that is the classy name my boys gave to the white chocolate and meyer lemon truffles we made this year. The recipe was requested on Instagram, so here it is! I adapted it from this recipe I saw on Pinterest.

After reading the reviews and tasting, we adjusted the recipe as follows:

Ingredients

  1. 12 ounces high-quality white chocolate, chopped or chips (Ghirardelli works well)
  2. 2 tablespoons unsalted butter
  3. 6 tablespoons heavy cream
  4. 1 teaspoon corn syrup
  5. 1 teaspoon lemon extract or pure lemon oil
  6. the zest of a whole lemon
  7. white sanding sugar for coating

Instructions

  1. Add white chocolate and butter to a bowl, then microwave on medium power for 30 seconds. Stir a few times, then microwave for 20 more seconds, OR melt over a double boiler (my preferred method).
  2. Add heavy cream and corn syrup to a small saucepan and heat over medium heat just until bubbles appear on the edges. This will happen quickly! Immediately pour the cream over the melted chocolate and butter, stirring well for a few minutes until combined. Stir in the lemon oil and lemon zest, mixing to combine. Place in the fridge (or even the freezer) for 1-2 hours.
  3. Remove from fridge and let it come to room temperature for about 10 minutes and scoop out teaspoon-size balls of chocolate with a melon scooper or small spoon. Roll them into balls and dip in the sanding sugar, coating completely. These hold up great at room temperature, but you may also store them in the fridge.


++++ 2014 UPDATE++++++ I tried using a different brand of white chocolate this year and the ganache was too soft – higher fat content apparently, so be mindful and keep a little chocolate back in case you need to add more to firm up the mixture.

white chocolate meyer lemon truffles aka yellow snowballs

How We Camp (Glamp)

Over the years, we have gotten lots of questions about how we camp as a family, and what we bring etc.. so I decided it was high time to show you. For one, we aren’t really camping, we’re glamping. Car camping is a different beast than proper backwoods camping, so I would like to get that clarification out of the way.

We bring too much stuff.

We have a great time.

It takes a lot of planning.

Modfrugal glamping

This is how the dining room looks before every trip.

Modfrugal glamping

Modfrugal glamping

Modfrugal glamping

Modfrugal glamping

Modfrugal glamping


As you can see…a lot of gear. Some campsites have great spots at the bath houses for washing dishes, others, notsomuch, so we usually take biodegradable plates and utensils so we only have to wash up the cutting board and cutlery. More and more campsites are offering recycling now, so call ahead and ask.


Modfrugal glamping

I also enjoy using baskets and liners since it creates less waste, and things like hot dogs won’t roll off the plate into the dirt.

Modfrugal glamping

We pack a battery powered air pump (shown in the 3rd photo) which not only gets the mattresses filled, but is the PERFECT campfire ember resurrection tool. No more sticking your face in the smoke to blow the embers!! You just point your pump, turn it on for a few seconds and your flames will be back without self asphyxiation – everyone wins!


modfrugal glamping

The blue tent below is our 15+ year old tent we replaced this year since it was threadbare, but it was the BEST. I called it the McMansion tent, since it was a little OTT and large, but again, this is glamping, so go big, or go home.


modfrugal glamping

modfrugal glamping

Our new tent had a smaller footprint, which we wanted in order to be more accommodating to the different sized pads at various campsites. Turns out, if it leaks, it’s not worth it. The McMansion had seen plenty of wet action over the years and never leaked, so we’ll be looking for another tent this fall.

modfrugal glamping

modfrugal glamping

The other FAQ we get is WHAT DO WE EAT? The answer is a lot of things, as long as you plan it out ahead of time. Simple steps, like making the pancake batter and packing it ready to squirt in an industrial squeeze bottle, will make meal prep easier.

Most campsites come with an adjustable grate over the fire ring, so we just bring the giant cast iron skillet and some foil, and cook pretty much everything in them. We cook a big breakfast, but lunch is on the go since we are usually out exploring, hiking, biking, fishing, whatever, so we just snack on granola bars or something to hold us over until dinner.

We have a BIG cooler, with wheels, and it’s always heaving when we leave.

Modfrugal glamping

Modfrugal glamping

Modfrugal glamping

IMG_6426

IMG_6620  IMG_3373

I should also note that I like to pack smushables, like tomatoes and grapes, in hard sided containers. They are great to use for leftovers later and they keep everything round and plump.

Modfrugal glamping

Modfrugal glamping

Depending on where you camp, you have to be really careful about food.

Modfrugal glamping


This means packing up the box of food and your cooler and putting it back in the car after meals. Even if you are not in bear territory, squirrels and raccoons can eat through a plastic trug in a very short period of time.

We also take a tarp and extra tent stakes in case it rains while we are making a meal.


modfrugal glamping

modfrugal glamping

Our list of items varies depending on where we camp, but this is pretty much what we take most trips:

plates, cups, bowls, baskets/liners
tablecloth/clips
cutlery
knives/cutting board
oven mitts
paper towels
antibacterial counter wipes
serving spoon/spatula/tongs
s’mores forks
aluminum foil
ziplocs
garbage bags
broom/dustpan
tray (round metal)
nutella
ketchup
coffee + coffee pot
olive oil
sugar
salt and pepper
water jug
wet wipes
hand soap
cast iron skillet
washing up tub/brush/bowls/dishwashing soap
lighters
mystic fire
fatwood/firewood/newspaper
tents
first aid kit
sleeping bags/air mattresses/pump
pillows
rope
tarps
repellent
sunscreen
masking/duct tape
rain protection
towels
speakers/ipod
batteries
slingshot
handshadows book/constellations book
chairs/stools
bungee cords
lanterns/mantles
headlamps/flashlights
swiss army knives
walking sticks
picnic blankets
glow bracelets
fishing rods/tackle
innertubes

Yeah, I KNOW. It’s ridiculous, but there it is.

All this camping talk is making me want to start researching parks for our next trip….

Garlic & Rosemary Jelly

Garlic Rosemary Jelly-Modfrugal

My research, and ultimate findings after 2 batches have yielded the recipe below. I am not 100% satisfied from an aesthetic perspective, but I am razzle dazzled *insert jazz hands* from a taste perspective. This stuff has wooed and wowed 2 parties now, and I am learning that a jar of this gold is quite a well received hostess gift.

It all started with some innocent reading of one of my fave e-zines Sweet Paul, when I came across their recipe for a garlic rosemary jelly. I have always loved savory/sweet jellies and jams, so this was right up my alley. Their recipe called for Pomona pectin, but I had plenty of Certo left over from last season I wanted/needed to use, so I adapted the recipe to work with my pectin on hand.

The first batch I made in Weck jars, the 7.4 oz Deco and the 7.4 oz. Tulip jelly jars.  The deco jars worked better since they are short and squat. The jelly jars seem designed for a clear jelly and not one with bits, since they float. With my second batch I used Ball wide mouth 8 oz jars because they were the squattiest ones I know of. More on that later.

This recipe is from my second batch, which is a double batch yielding about 8 cups of jelly.

Prepare your jars by putting them in the canner in simmering water. (I actually don’t have a canning pot but simply use a stock pot with a round cookie cooling rack set in the bottom to keep the jars elevated…might be time for an upgrade?)

3 1/2 cups white wine
1/2 cup white balsamic vinegar
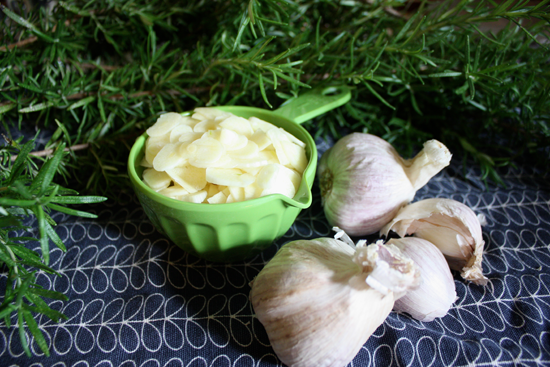
1 heaping cup slivered garlic
10 thick branches of rosemary, plus 10 small sprigs, rinsed and blotted dry
7 cups of sugar
pat of butter
2 pouches Certo pectin

Simmer the wine, vinegar, garlic and 7 branches of the rosemary for about 15 minutes on medium high to infuse the liquid with flavor.

Garlic Rosemary Jelly-Modfrugal


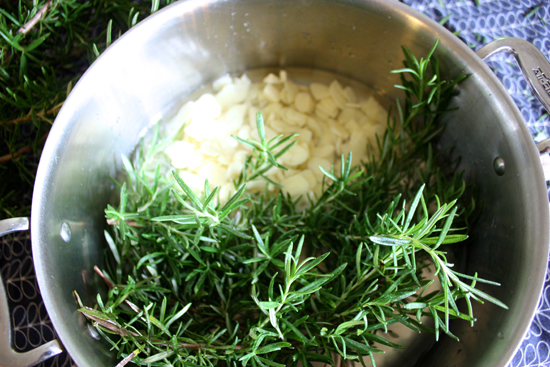
This where things might get a little controversial. Every other recipe I’ve seen puts the rosemary in a sachet, or some other way to keep it out of the liquid, but I am shamelessly greedy when it comes to rosemary, and I wanted to infuse as much flavor as possible despite the extra work naked branches brings to the equation. If you want this to go faster, chop the rosemary leaves and put into cheesecloth with the garlic/wine/vinegar. Otherwise, follow my completely unprofessional method.

Because I didn’t want the sugar to dilute the rosemary flavor too much, I have done the unthinkable and added the sugar BEFORE fishing out the rosemary. I also add a pat of butter at the same time to prevent foaming on top, stirring constantly. After the first few minutes, when the mixture is starting to bubble, I fish out the 7 rosemary branches and replace them with the remaining 3 fresh branches.

Garlic Rosemary Jelly-Modfrugal

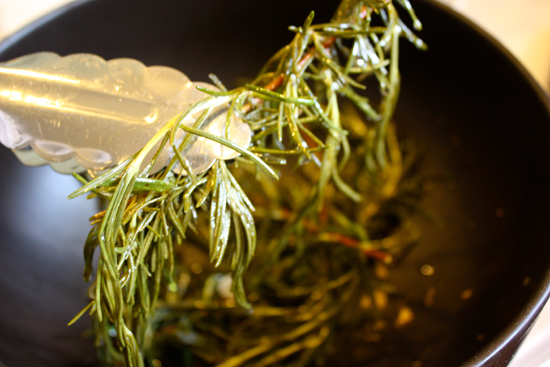
Then comes the tedious part. After a few more minutes of bubbling, simmering and constant stirring, I fish out the remaining branches and start to strain the stray rosemary bits from the mixture. If I had used the cheesecloth, this would not be necessary, but I was working on instinct not expediency here.

Garlic Rosemary Jelly-Modfrugal

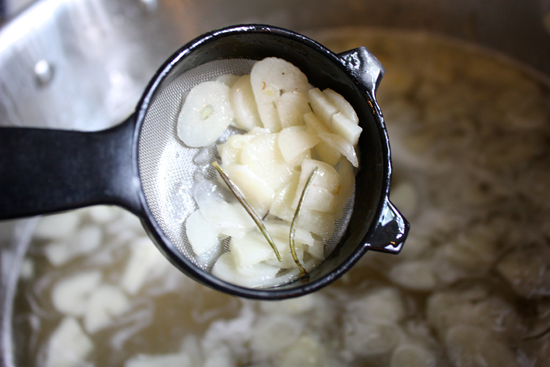
I use a bamboo skewer to pick out the rosemary from the garlic and return the garlic to the pot. Once the mixture is syrupy, a skewer is the best tool for picking out stray leaves.

Then add the 2 pouches of pectin… and even though the packet directions say to boil for only a minute, I found that instead of a rolling boil, a low boil for 3-5 minutes works better here. Less foam.

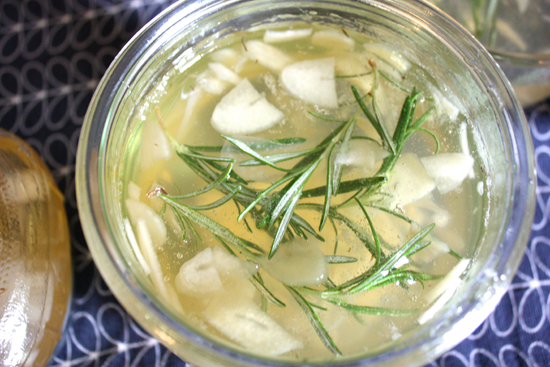
Ladle into your jars, then add a fresh sprig of rosemary, and process as usual. (Put on lids/rings and put into boiling water, 1-2 inches above the jar tops and simmer for 10 minutes).

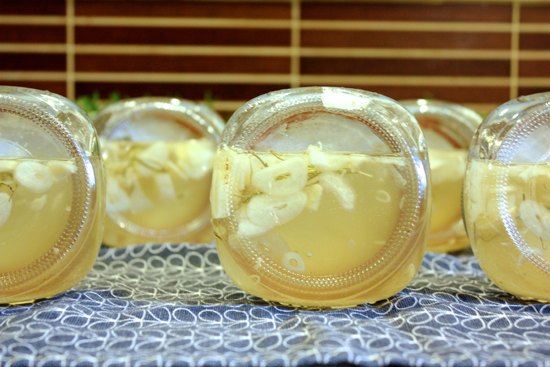
I reserved some jelly to put into a jar as refrigerator jelly because of my frustrations with presentation. When the jelly is processed, the rosemary sprig loses its green fresh look, as you can see….

Garlic Rosemary Jelly-Modfrugal

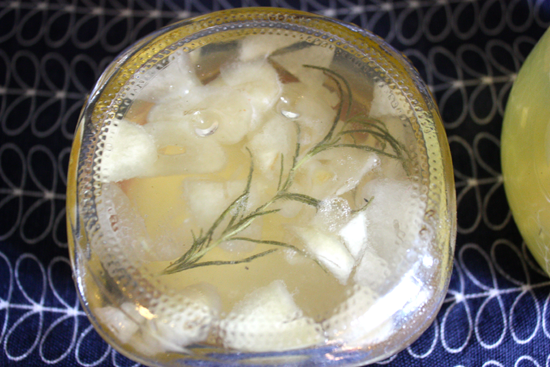
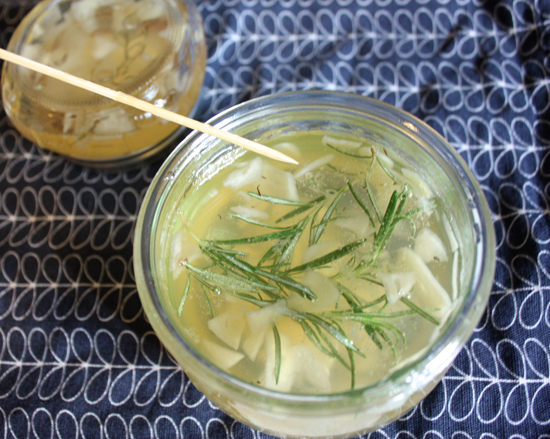
…but the jar that was not processed in the canner didn’t recook the jelly, so the rosemary sprig stays fresh looking.

Garlic Rosemary Jelly-Modfrugal

Garlic Rosemary Jelly-Modfrugal

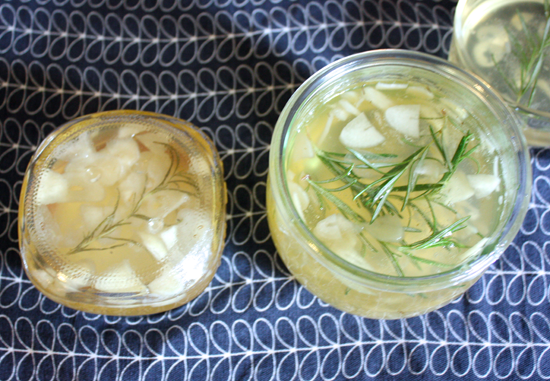
You can also see above the difference in color between the processed jelly (left) and refrigerator jelly (right). The processed jelly turns a more golden color, where the fridge jelly stays a clear, pale gold with a hint of green. The other situation is the garlic slivers. They will float to the top of the jar, so after all the lids have “popped” and are adequately sealed and the rings tightened,  I started to rotate them every 15 minutes to distribute the garlic and rosemary throughout the jar. Doing this while the jelly is still warm and liquid allows the bits to move throughout the jar.

Garlic Rosemary Jelly-Modfrugal

To can the jelly without the rosemary seems like a huge loss, since it will then appear as only a garlic jelly, but the fridge jelly, while not shelf stable for months, is, in my opinion, prettier. For the fridge jelly, instead of rotating the jars, I simply used a skewer (again) to push down the garlic and rosemary every 15-20 minutes while it cooled. The fridge jelly sets just fine without the reprocessing for those who might wonder.

Garlic Rosemary Jelly-Modfrugal

While both taste really wonderful, I think that from a presentation viewpoint, and for an immediate gift, don’t reprocess the jars. To save some of this deliciousness for the winter months, can away, but it is unlikely to last that long in my brief experience!

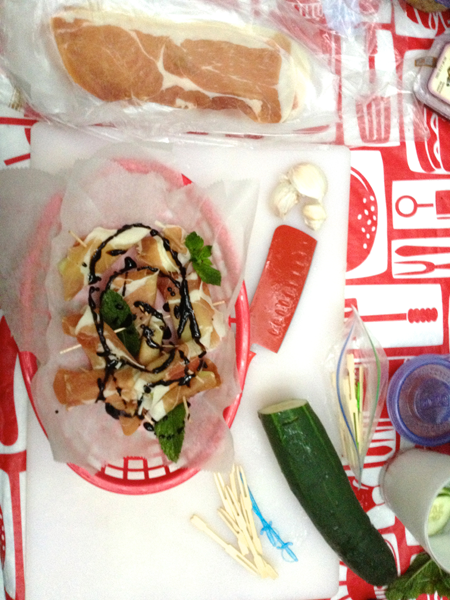
My favorite way to eat it is over goat cheese, spread on a rosemary cracker, or other thin crispbread. It’s also wonderful with pork or chicken. Play with it, and tell me how you end up using it!


Outside

That’s where I’ve been all these weeks.

While it’s a cliché to talk about the weather, it matters here. We’ve had cool evenings with low humidity, and we know that there can only be a few seconds, last gasps if you will, of this Spring-like weather left before Summer rolls in. For the rest of the country, Summer IS outside time, but down here? Unless you’re in a pool or creek to cool off…notsomuch.

The sticky, humid, broiling, bug infested Summers of the South force everyone indoors, since sitting motionless in the shade, or after sundown may still cause profuse sweating. Ah, 95% humidity…I know you’re coming, and I’m not wasting time. Not. One. Single. Moment.

We installed some outdoor string lights, and it has made an enormous difference in our evenings.  We can see to eat without lighting 20 candles and I don’t have to wear a headlamp to take the dog to the bathroom.  It’s the little things….so here’s just a few snaps of where we’ve been spending all our free time.

Cool nights make for good treehouse sleeping……


I’d say we have eaten 70% of our meals outside this past month….and cooking them out there too.


Happy Summer!

Olive & Sinclair

By now, most local Nashvillians have heard of Olive & Sinclair Chocolate. They are the only bean to bar chocolate maker in the South, and they are now giving tours of their small operation on Friday afternoons. I’d been looking forward to taking the Things there since we booked it a week ago, and we were not disappointed.

It’s so wonderful to see people working at something about which they are so passionate, and these guys clearly love their job. The owner, Scott was out of town, but his 2 colleagues seemed to have it all well in hand. Please excuse my very poor phone photos…

I don’t want to give away all the fun facts from the tour for those wanting to go, but I will share a couple of tidbits. They use a coffee roaster obtained from Nashville’s own Bongo Java for their cacao beans (from both Ghana and the Dominican Republic), and there is ZERO waste. They are able to trade or donate all of their cacao shells and nib dust to local breweries like Yazoo for chocolate beers, or local farmers as mulch, etc.. Nothing is wasted and they make every effort to work with local artisans in any way possible.


These bourbon barrels from local distillery Corsair are used to flavor the new Bourbon Nib Brittle that was available for tasting…divine!

We couldn’t see the bars actually being made because only 4 people run this whole operation, so they have to shut down so they can give the tour! The video at the bottom from the O & S website does show it all, so check it out.

You know we came home with some of that goodness. The Things went safe with the 67%, I went for the nibs, and the CC likes it spicy.

When we asked if we could have a couple of cacao beans for Thing 2 to take to his share at school, they gave us a whole bag along with some samples for the kids to taste!  So nice and generous. I think Thing 2 will be getting some high fives at school this week!

Not only is it the best chocolate I’ve ever tasted, but the most beautiful, hand wrapped packaging, and super nice people with a great business philosophy to boot. No, this is NOT a sponsored post, but I am a superfan…obvs.


Photo via Olive & Sinclair

Olive and Sinclair Artisan Chocolate from josh anderson on Vimeo.


Mascarpone

If the weather keeps up this wacked out pattern, it will be berry season in two weeks.  So, in order to prepare you for the possible early bounty of climate change, let’s make some mascarpone to go with those early season berries!

We are not experts, this is just what we did and we liked the result. It’s one of the easiest cheeses to make as long as you get the right ingredients.

1 Quart of half and half or other light creamPasteurized is fine, but NOT ultra-pasteurized.  If it’s UP, it will say so on the bottle/carton.  I found some at Fresh Market, I’m sure Whole Foods has it, and if you have a raw milk source…I’m sure that would be amazing..haven’t tried it yet. For the record, we did make a batch with half ultra-pasteurized whipping cream and half regular pasteurized milk, and it worked, but didn’t perform as well.

1/4 teaspoon of Tartaric AcidNOT Cream of Tartar.  Locally, I’ve been told All Seasons Gardening and Brewing carries it.  We got ours from a cheesemaking kit we had forgotten about!  Some people like to make it with lemon juice, but we decided to stick with what our cheesemaking book told us.

So don’t you like how both of the ingredients involve me getting all bossy about what NOT to get? Do you know how easy it is to typo MasCRAPone? Yeah, I thought so. Moving on…..

Get a double boiler going and heat the cream until the temperature reaches 185°.  Add your Tartaric Acid, whisk, remove from the heat and pour into a sieve topped with moistened layers of fine cheesecloth or butter muslin. Let cool, and refrigerate covered for about 12 hours.  Best used within a week…Enjoy!!

Yum.  I added fresh mint to one batch and it was nice, but not as minty as I was expecting. The cheese overwhelmed it a bit. (Yes, I actually have mint right now..crazy).  Experiment with flavors you like and have fun.

2/10/12 UPDATE:  I had a batch recently that wasn’t as smooth in texture as I wanted, and by putting it in a small food processor (a stick blender might work too) the texture smoothed out and fixed it!